
Be honest, how many times have you scrolled past a profile based on the image you saw? Rightly or wrongly, a good headshot photo on your blog or social media can make all the difference. It allows your readers to connect with you and, much like your logo, can be used to showcase your personal brand.
Of all the images you may want to use on your blog, your personal headshot will have the most versatility. You can use it on:
- Instagram and other social media
- Your email signature
- Your letterhead, and
- In the corner of Pinterest pins.
However, when you’re working with a budget, or even just starting out, pricing up a professional headshot isn’t always an option. This post will show you how to take a professional-looking headshot for your history blog.
In full disclosure, this post contains affiliate links. I only ever recommend products I use myself and believe will be of value. For more view my policy page.
Where to Start
Don’t selfie and don’t be tempted to crop down a wedding photo! Clear your photo library of the 800 pictures of your cat (we get it she’s cute) set aside a couple of hours, iron your best shirt and use this handy guide to taking some of those professional-looking headshots you’ve seen online.
And grab someone to help you if you can. It will make things a whole lot easier. But if you have to shoot alone then pick up a cheap tripod, it’s always handy to have one at home in today’s visual world and is a solid investment.
Cameras on phones have come a long way so don’t be afraid to use your mobile phone for your headshot. Although they don’t replace the quality or versatility of a DSLR they’re a cost-effective way to get those much needed social media and blog shots.
How to be Instantly More Professional-Looking
Smarten up
Look presentable. Wear something simple and neutral. Black and white is a good go-to for simplicity, but it can also be a bit boring. Don’t be afraid to add a bit of accent colour, just don’t go overboard with overly bright hues or crazy patterns.
You can wear those comfy pyjama pants with pandas on if you want (they won’t be in frame after all) but make sure your top half is presentable. Try out different looks too. Maybe some more formal ones mixed with some fun ones, and have a couple of outfits to choose from. Add a jacket, put on your reading glasses, tie up long hair.
Experiment with the style and find which one you feel represents the image you want to portray, or which look best shows your personality. Even if you don’t use these extra images now you should save them for future use.
Pose
You should position the camera to take an image from the chest up, your focus should be directed at the camera and you should always avoid flash. Unless you have a diffuser the light produced from your camera/phone flash is too harsh and not at all flattering.
Additionally always shoot these types of photos in portrait, not landscape. As for your pose, don’t sit face on, angle yourself slightly at about 30 degrees. Clasping your hands in front of you or folding them will help you ease into the photos and will also help you relax. Treat your first few photos as tester photos while you get the balance right.
Consider your Backdrop
The best backdrop or background for a headshot is plain and uncluttered. Pale, single coloured walls without a pattern is a good start preferably in a contrasting colour to what you’re wearing. These images are sometimes shrunk down quite small for social media icons or for the author icon on your blog so to stop them appearing cluttered plain is best.
As a rule, remember that darker colours absorb the light where lighter colours reflect it. If you’re struggling for the extra light head to a room with white or lighter walls.
A plain coloured or white sheet works fine too. Iron it! I’m one of those “life is too short for ironing” people but in this case, you’ll thank yourself for it later. Then stretch it out to avoid creases or find something to hang it from. A few clothes pegs will help here.
Take your time. It might take two hours out of your day but it will be worth it.
Related Post: Is a headshot for your blog one of your goals for the year? Here’s some help in setting your goals.
Common Problems with Headshots
Q: Help My Headshot Photo is Orange! What’s the Problem?
A: Now this might all sound complicated and chances are your camera or phone will be able to adjust or fix the colour casts for you on its own. In which case that’s great!
TIP: Make sure when you’re shooting on your camera that you’ve selected the settings for white balance correctly. On your phone this might be labelled as warmth.
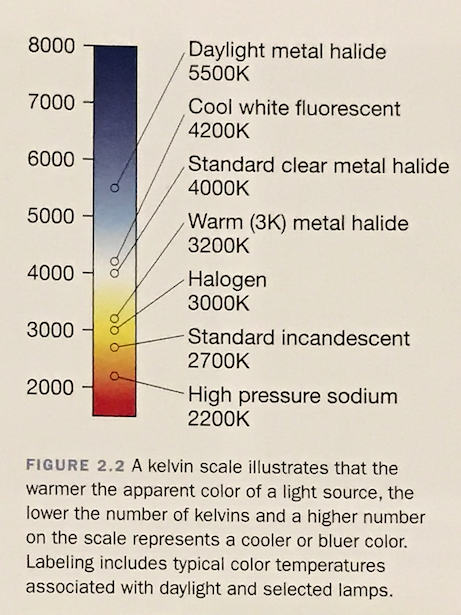
But, if you’re finding yourself struggling with colour casts here’s a guide below to help you. Here we go! The colour temperature of light is measured in Kelvins. This in short means how cool or warm the light is. The lower the number, the warmer the light and the higher the number, the cooler the light.
- Sunlight is blue, cooler light.
- The light inside is often tungsten. Orange, warm light.
Why does this matter? Well the wrong kind of light can give your images a colour cast that’s not at all flattering and will take time to fix. If you can eliminate this issue from the outset then you’ll save yourself the headache later on.
Q: How do I Shoot my Headshot Outside?
A: Everyone’s home is different, you might have a big, brightly lit, open kitchen to take photos in. But you also might be in a flat in a rainier part of the world.
We’re looking at you Manchester.
If you’re struggling with weird colour casts then head outside. Natural light is always a far better option than fighting indoor shadows and the orange cast from bulbs. Because the light outside is, of course, changeable search for opportunities to shoot in what’s called open shade. This is essentially indirect sunlight so that it’s not too harsh and you won’t find yourself squinting. Beware too much shade though as the photos will be dark and gloomy. A happy medium is to find some shade, most likely under a tree, and face the direction of the sunlight.
Q: How do I Shoot a Professional-Looking Headshot Inside?
A: A super budget option for indoor lighting is a couple of directional lamps. You can pick up some light bulbs that have the right temperature (kelvin) of light. If the bulb has a warm glow it will cast orange, if it’s too blue the resulting image will look like you’re sat in a hospital waiting room. The packaging will tell you where on the scale it is, and a rule of thumb is to aim for the mid-range of 4000K or 5000K.
As for the lamps it’s better to use two light sources; one for either side of you. But if you only have the one aim it slightly above and back from you a few feet. There’s no exact way to get this right, it’s just trial and error.
However, a way of countering what could be a confusing search for bulbs is to pick up some cheap modelling lamps on Amazon.
Again, having these handy might be useful when it comes to getting some extra photos for your blog or social media, so you could look at them as an investment. They can be as little as £30 and often come with a softbox (which is simply a diffuser for a softer more flattering light).
Here are three budget picks from Amazon (paid links):
If the budget doesn’t stretch for these though place yourself across from a window to maximize indoor light. Or as said above head outside wherever possible.
Q: My Perfect Headshot Photo is a Bit Dark?
Congrats you’ve taken a professional-looking headshot! Trouble is, it looks a bit dark.
Don’t delete it, it might yet be salvageable with the settings on your phone or with some free apps.
Try boosting the contrast and exposure a little to brighten the image. Be careful not to overexpose or “blow out” the white parts of the image though. And although it might be tempting don’t go too crazy with the filters. That super smooth skin and green eyes you just gave yourself might look appealing, but it’s not a good representation of you.
There’s a whole host of apps out there with extra features and settings to help you adjust and tweak an image. A lot of them are free so have a look on your app store and test some out.
One of the more popular ones at the moment is VSCO, but your phone will also have its own settings to adjust contrast and exposure.
There’s no right way to edit an image as every image is different and requires different adjustments. The best way to learn in this instance is by doing. You’ll soon come to grips with how the settings affect your photos. If you’re worried about messing up save an extra copy of your image that you can go back to.
Q: I get a bit Overwhelmed with Photography. What do all the Different Settings Mean?
- Exposure:
- How much light is in an image. Too much can lead to overexposure and too little to underexposure. Images that are a bit dark can sometimes be lightened, use this in conjunction with brightness and contrast to get the best results.
- Brightness:
- Increases brightness in an image while preserving the highlights. (brighter white parts)
- Contrast:
- Adjusting contrast will make shadows darker and highlights brighter and vice versa. For example if your black blazer is looking a bit grey add a bit of contrast to bring it back to black.
- Saturation:
- How intense the colours are. Less is more with this tool as it blanket alters the whole image and can leave paler skin tones looking orange.
- Vibrance:
- More intuitive, it sees which colours are already quite saturated and only corrects the less saturated colours.
- Warmth/Temperature and Tint/Tone:
- All these types of settings add more blues, reds, greens or yellows to your image on a sliding scale. You’ll rarely need to change the greens and yellows, but little adjustments of reds and blues can help fix images that have the colour casts we explained above.
- Sharpness:
- Pretty self-explanatory, but beware sharpening an image too harshly. It serves to correct slight blurring on an image, but with a tripod you should manage to avoid this issue.
- ISO:
- The ‘digital light’ the sensor of the camera produces to correct an underexposed (dark) image. Higher ISO settings produce noise so try to keep this low.
- Noise Reduction:
- Noise is simply pixels of varying colours that occur when your camera sensor is adding digital brightness. It will make an image appear grainy. Noise occurs when the camera steps in to counter the darkness in an image. If your images look grainy improve the light in the room. Too much of the noise reduction setting can soften your images and reduce clarity.
Sometimes getting a professional-looking headshot photo can be tricky but it’s absolutely worth the effort. So, don’t be disheartened if you struggle to get it absolutely perfect at first. The most important thing is that it represents you and your brand and that you’re happy with the outcome, whether you were wearing those panda pyjama pants or not.
As always, do get in touch about your hits and misses about creating a professional-looking headshot, I’d love to hear your stories.
Until next time.
Elizabeth